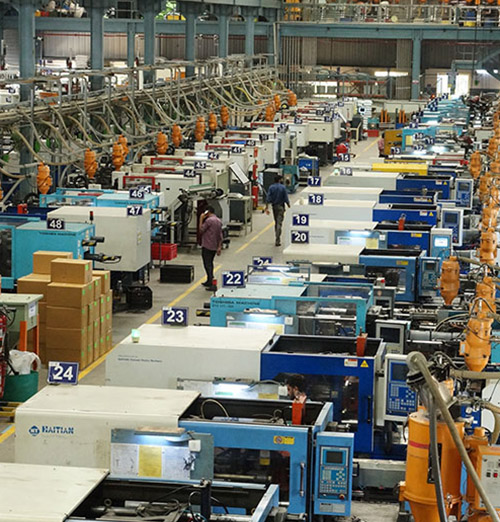
A Guide to Venturi Fertilizer Injector

A fertilizer injector is a device used to inject/apply water-soluble fertilizers, pesticides, plant growth regulators, wetting agents, disinfectants, and mineral acids into the piping system during crop production. The device is a vital part of modern irrigation operations. Since the introduction of venturi injectors, farmers have enjoyed an easy, time and labor-saving method of applying liquid chemical solutions to their crops.

Despite the advantages, many farmers have had at least one experience with a malfunctioning injector. Factors like the right selection of venturi injector, installation, operation by creating the right pressure differential, the correct quantity of fertilizer/chemical injection, and timely maintenance are crucial to ensure optimum injector performance.

Read More: Automatic Irrigation Systems – New technology awareness and its benefits to farmers

How to Select Venturi Fertilizer Injector

Venturi injector is the most popular device because of its easy usage as it injects the fertilizer or chemical directly into the system by just maintaining the right pressure differential. But farmers always complain of higher injection time or most of the time no injection of fertilizer. There are certain points mentioned below that one needs to remember at the time of purchasing of venturi injector from the market.

  • Maximum pressure at the Pump/ Head Unit installed in the field.
  • Field pressure at which the drippers/sprinklers are running in the field.
  • See the performance chart and check the inlet and outlet pressure available in your field for the right selection.
  • Assessing the performance of the venturi injector at very less pressure difference between inlet and outlet.
  • Buying the venturi according to the requirement of injection rate at the inlet and outlet pressure.
  • Select the venturi injector having a check valve at the suction port.
  • Buy the venturi injector with their side assembly from the same company, don’t try to purchase and assemble the parts from different companies.
  • Remember that all branded companies have venturi  (fertigation)  available in all sizes ranging from ¾” to 2” as per the requirement of fertilizer injection rate.

Read more : How does low-cost automation in filtration benefit irrigation systems and farmers?

Venturi Fertilizer Injector Installation Tips

  • Always keep in mind that a Venturi Injector should always be installed in a horizontal or vertically upward position and in the direction of flow (flow arrow marked). Installation in a vertically down position may cause intermittent or erratic suction by the injector.
  • Always use “full flow” valves and fittings when connecting to a venturi injector. Never use pipe fittings smaller than the thread size of the venturi injector. (We recommend buying the side fittings from the same company)
  • Do not over-tighten venturi injectors when fixing them to pipes or fittings. The use of a thread sealant/tape is recommended.
  • Venturi injectors require a pressure differential to operate properly. Normally, the outlet pressure must be at least 25 – 30% less than the inlet pressure for significant suction to occur.
  • Pressure gauges are recommended to determine the actual pressure difference.

Related Articles: Venturi Manifold for Herbicides

Problems Faced During Operation and How to Solve Them

When properly selected, installed, and operated, Venturi Injectors provide trouble-free operation. In the real world, however, there are a number of factors that can decrease the performance of the venturi injector. These factors are discussed in detail below:

  • Venturi Injector is not working

    There are some simple steps to determine whether the venturi is working or not:

    Step 1: Check if you can feel the suction when the suction line is disconnected and the injector is in operation.

    Step 2: With the suction line disconnected and the injector in operation, gently press the ball inside the internal check valve on the suction port (a slender, blunt tool should be used for this purpose). Check if the water spurts out of the suction port?

    Step 3: If you can feel suction and water does not spurt out of the suction port during operation, the injector is generating a vacuum and is working properly. If you cannot feel suction and water does spurt out of the suction port during operation, the injector is not generating a vacuum.

    Step 4: Check if the Injector is damaged. It can be damaged by over-tightening, from impact, or from being subjected to excessive torsion. If you suspect this to be the case, examine the injector for cracks, holes, or other signs of damage. If any of these signs of damage are found, replace the injector.

  • Insufficient Pressure Differential

    Reputed brands’ venturi typically begins suction with a water pressure differential of about 20% and above. Significant suction does not begin until the water pressure differential is in the range of 25-30%, but a local company’s venturi doesn’t start suction till the water pressure difference reaches 50. An important characteristic of venturi injectors is that they do not, by themselves, create a pressure differential. Both the upstream and downstream pressures experienced by an injector are caused by the system into which the injector is placed. Thus, merely placing a venturi injector in a pressurized water line will not necessarily create a significant water pressure difference, other than the friction loss. If a particular system cannot generate sufficient water pressure differential for the venturi injector to operate properly, then an alternative method of installation must be considered.

  • Insufficient Water Flow

    At any given set of inlet and outlet water pressure, Venturi injectors require a certain water flow. This water flow may be determined from the Venturi injector Performance table for each size by the manufacturer. If less water is supplied than stated in the performance table, suction capacity could be decreased or disappear entirely.

    There are several possible causes for insufficient water flow. These are:

    • The supply pump is incorrect, worn, or damaged.
    • Inlet and/or outlet piping are too small. Piping and pipe fittings should always be of the same piping size as the injector thread size.
    • There is debris or an obstruction on the upstream side of the injector.
    • The injector selected is too large. Select an injector that requires less water flow.
  • Suction Line is Obstructed

    The suction line to a venturi injector may become dirty or obstructed. Therefore, it should be checked periodically to make certain that it is clean and clear.

  • Injector is Scaled or Fouled

    Many contaminants found in water can precipitate on water-wet surfaces. These surfaces include the interior of the venturi injector. When this occurs, the performance of the injector can be severely impaired. Sufficient scaling and/or fouling can cause a complete loss of suction capacity. Compounds that can cause scaling and /or fouling include calcium carbonate, iron, manganese, metal sulfides, calcium sulfate, silica, and microbiological slimes. Many times scaling and/or fouling are most severe at the point of chemical injection. This is due to the chemical being extremely concentrated at the injection site owing to water not passing through this point which would dilute it.

    Scaling and/or fouling of the venturi injector are not designed flaws of the injector. Rather, they are characteristics of the water being treated and would occur with any method of chemical injection. When scaling and/or fouling occurs, the venturi injector must be removed from service and cleaned with the proper use of chemicals.

Read more : How to use STP water for green urban area?

Ways to Maintain Venturi Fertilizer Injector

  • Pour 5 litres of water into a 20 litre bucket.
  • Pour 1 litre of ” Pool Acid” into the bucket – ALWAYS ADD THE ACID INTO THE WATER. (“Pool Acid” is Hydrochloric Acid or Muriatic Acid. Typical ” Pool Acid” is about 30% acid).
  • Place the injector in the bottom of the bucket and allow it to soak for 1 hour.
  • Rinse the injector with fresh water and place it back in service.
  • When finished cleaning the injector, fill the bucket with water and dispose of it properly.

Conclusion

Fertigation directly provides essential elements to the active root zone, thus minimizing losses of expensive nutrients, which helps improve productivity and quality of farm produce and reduce the risk of environmental pollution. By selecting of reputed brand’s Venturi injector (https://www.automatworld.in/fertigation) and with correct installation, the farmer will get benefits in terms of life of the venturi injector, less operational problems, reduction in the system running cost, more area to irrigate because of less throttling of line and uniform distribution of fertilizer to the crops which will lead to higher crop yield.